
前言
我们前面学习了SpingBoot的自动配置原理,知道SpringBoot自动配置依赖于各种定义好的Starter,通过Stater中定义的信息确定是否对各种Bean实例化。学习一下如何实现自定义的Starter,能够加深我们对SpringBoot的理解并且有助于工作中可能使用到的场景。话不多说,直接上步骤
新建项目
创建一个maven的项目,不引入任何的依赖,项目名称 redis-util-spring-boot-starter 关于starter命名规则
Spring官方Starter通常命名为spring-boot-starter-{name}如:spring-boot-starter-web
Spring官方建议非官方Starter命名应遵循{name}-spring-boot-starter的格式:如mybatis-spring-boot-starter
配置pom文件
<parent>
    <groupId>org.springframework.boot</groupId>
    <artifactId>spring-boot-starter-parent</artifactId>
    <version>2.3.5.RELEASE</version>
    <relativePath/>
</parent>
    <dependencies>
        <dependency>
            <groupId>org.springframework.boot</groupId>
            <artifactId>spring-boot-autoconfigure</artifactId>
        </dependency>
        <dependency>
            <groupId>org.springframework.boot</groupId>
            <artifactId>spring-boot-configuration-processor</artifactId>
            <optional>true</optional>
        </dependency>
        <dependency>
            <groupId>org.springframework.boot</groupId>
            <artifactId>spring-boot-starter-amqp</artifactId>
            <optional>true</optional>
        </dependency>
    </dependencies>
创建配置属性类
package com.tao.redis.properties;

import org.springframework.boot.context.properties.ConfigurationProperties;
@ConfigurationProperties(prefix = "redis.token")
public class TokenProperties {
    //命名规范必须是驼峰式,解析时会自动将大写转小写,并加-
    private String redisHost="localhost";
    private String redisUsername="root";
    private String redisPassword="root";

    public String getRedisHost() {
        return redisHost;
    }

    public void setRedisHost(String redisHost) {
        this.redisHost = redisHost;
    }

    public String getRedisUsername() {
        return redisUsername;
    }

    public void setRedisUsername(String redisUsername) {
        this.redisUsername = redisUsername;
    }

    public String getRedisPassword() {
        return redisPassword;
    }

    public void setRedisPassword(String redisPassword) {
        this.redisPassword = redisPassword;
    }
}
创建Service类
package com.tao.redis.service;

import com.tao.redis.properties.TokenProperties;
import org.springframework.beans.factory.annotation.Autowired;

public class TokenService {

    @Autowired
    private TokenProperties tokenProperties;

    public String getToken() {
        //模拟生成token的信息
        return tokenProperties.getRedisHost() + "," + tokenProperties.getRedisUsername() + "," + tokenProperties.getRedisPassword();
    }
}
创建自动配置类
package com.tao.redis.config;


import com.tao.redis.properties.TokenProperties;
import com.tao.redis.service.TokenService;
import org.springframework.amqp.rabbit.core.RabbitTemplate;
import org.springframework.boot.autoconfigure.condition.ConditionalOnClass;
import org.springframework.boot.context.properties.EnableConfigurationProperties;
import org.springframework.context.annotation.Bean;
import org.springframework.context.annotation.Configuration;

@Configuration
@ConditionalOnClass({RabbitTemplate.class})
@EnableConfigurationProperties(TokenProperties.class)
public class TokenAutoConfiguration {

    @Bean
    public TokenService tokenService(){
        return new TokenService();
    }
}
创建spring.factories文件
在资源目录下,创建文件META-INF\spring.factories,指定自动配置类的路径
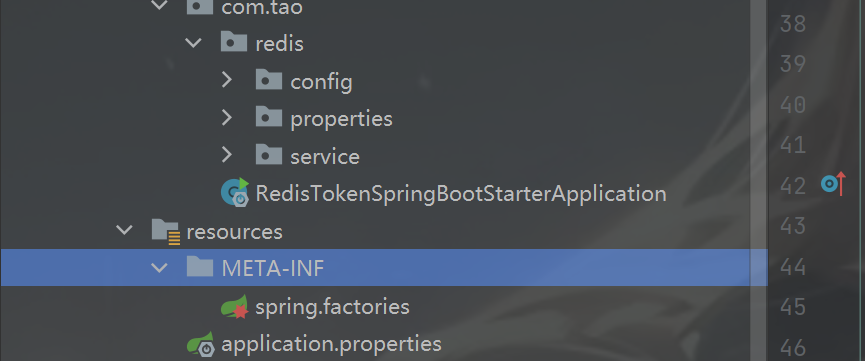
#后面的路径是TokenAutoConfiguration所在的路径
org.springframework.boot.autoconfigure.EnableAutoConfiguration=\
  com.tao.redis.config.TokenAutoConfiguration
打包
把项目打成jar发布到maven仓库,可以使用命令行的方式或是IDEA集成MAVEN的功能

测试
新建一个SpringBoot的项目,导入依赖
    <dependencies>
        <dependency>
            <groupId>org.springframework.boot</groupId>
            <artifactId>spring-boot-starter-web</artifactId>
        </dependency>
        <!-- 自定义 starter -->
        <dependency>
            <groupId>com.example</groupId>
            <artifactId>redis-token-spring-boot-starter</artifactId>
            <version>1.0.0</version>
        </dependency>
        <!-- rabbitMq依赖,测试自动配置功能 -->
        <dependency>
            <groupId>org.springframework.boot</groupId>
            <artifactId>spring-boot-starter-amqp</artifactId>
        </dependency>
    </dependencies>
编写启动类
@SpringBootApplication
public class SpringBootDemoApplication {

    public static void main(String[] args) {
        ConfigurableApplicationContext context = SpringApplication.run(SpringBootDemoApplication.class, args);
        //获取自定义依赖中定义的Service
        TokenService tokenService = context.getBean(TokenService.class);
        //查看输出
        System.out.println(tokenService.getToken());
    }
}
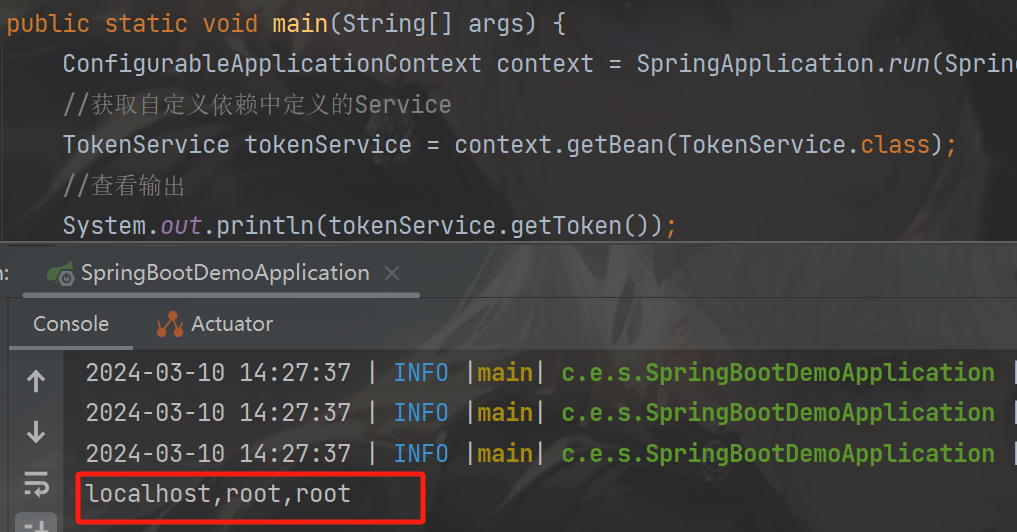
执行结果,符合我们自定义starter中 TokenProperties类的默认值
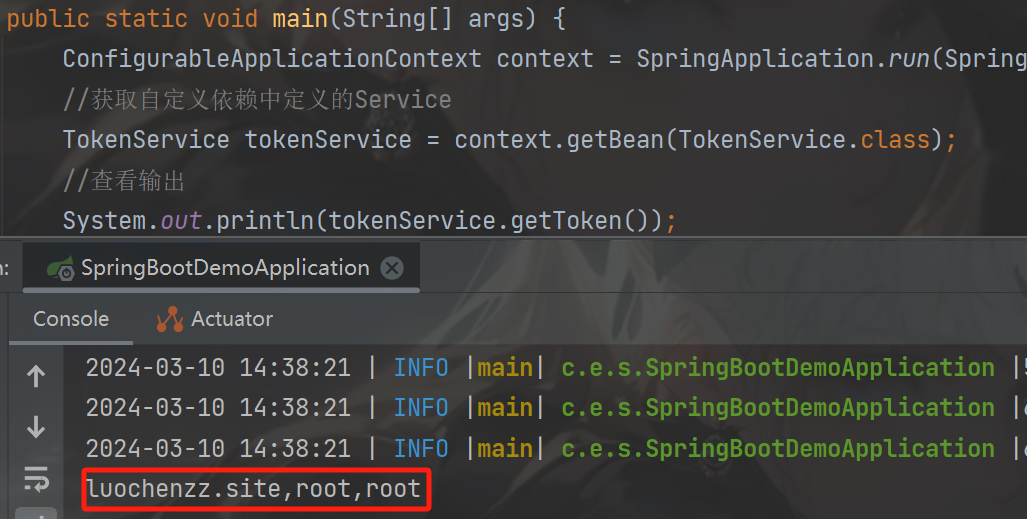
修改yaml文件,测试配置参数是否生效
spring:
  application:
    name: spring-boot-demo

redis:
  token:
    redis-host: luochenzz.site
控制台输出如下,没有问题
还记得我们怎么定义的starter中的配置类吗?
@Configuration
//条件注解,意味着只有当RabbitTemplate类存在,配置类才会生效
@ConditionalOnClass({RabbitTemplate.class})
@EnableConfigurationProperties(TokenProperties.class)
public class TokenAutoConfiguration {

    @Bean
    public TokenService tokenService(){
        return new TokenService();
    }
}
我们前面的pom文件中是导入了rabbitMQ的starter的,现在修改一下pom文件,注释掉相关依赖
 <dependencies>
        <dependency>
            <groupId>org.springframework.boot</groupId>
            <artifactId>spring-boot-starter-web</artifactId>
        </dependency>
        <!-- 自定义 starter -->
        <dependency>
            <groupId>com.example</groupId>
            <artifactId>redis-token-spring-boot-starter</artifactId>
            <version>1.0.0</version>
        </dependency>
        <!-- rabbitMq依赖,测试自动配置功能 -->
<!--        <dependency>
            <groupId>org.springframework.boot</groupId>
            <artifactId>spring-boot-starter-amqp</artifactId>
        </dependency>-->
    </dependencies>
启动项目看看结果如何
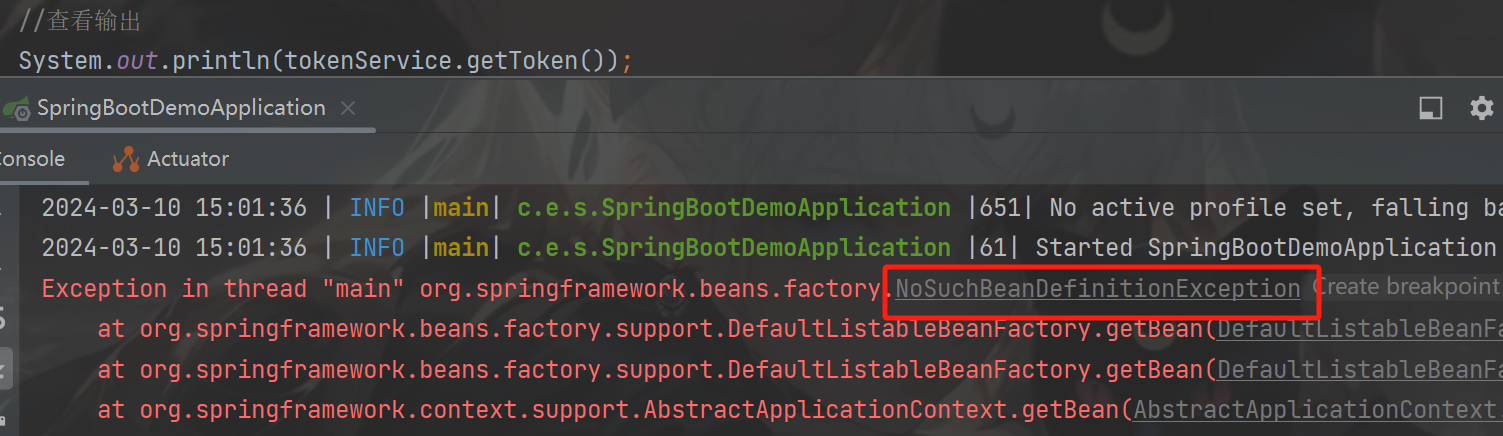
报异常了 NoSuchBeanDefinitionException ,具体如下:
No qualifying bean of type 'com.example.service.TokenService' available
意思也很简单,就是容器中找不到符合的Bean对象,也就是 TokenService 类没有被实例化。符合我们的预期,当 @ConditionalOnClass({RabbitTemplate.class}) 不满足时,自动配置不会生效
踩坑记录
这里有个大坑!自定义starter打包的时候,最终打出来的包目录是这样的
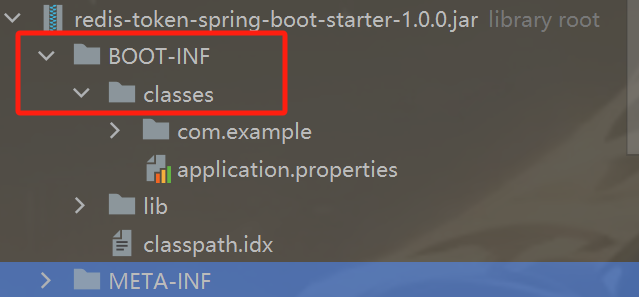
多了两层结构,当你在使用 Spring Boot Maven 插件(或 Gradle 插件)打包 Spring Boot 应用时,生成的 Jar 包通常会包含一个特殊的目录结构,这主要是为了支持 Spring Boot 的“可执行 Jar”特性。这种 Jar 包不仅包含了你的应用代码(在 BOOT-INF/classes 目录下),还可能包含所有必需的依赖库(在 BOOT-INF/lib 目录下,如果你的配置允许打包这些库的话)
最终导致的结果就是项目报红,表示找不到TokenService类!

解决办法很简单,自定义starter的pom文件中,不要添加如下配置,如果有就去掉(使用IDEA创建spring项目默认会添加)
    <build>
        <plugins>
            <plugin>
                <groupId>org.springframework.boot</groupId>
                <artifactId>spring-boot-maven-plugin</artifactId>
            </plugin>
        </plugins>
    </build>
总结
这篇文章中我们学习了如何自定义springboot starter 并且测试正确,加深了对springBoot的理解,帮助我们更好的掌握它。